さくらのVPSでCentOS7のサーバーを構築する 番外編…「Let’s Encrypt」でSSL/TLSサーバー証明書を無料で取得する
投稿日:2017年11月14日
最終更新日:
もくじ
- 番外編…IPアドレスベースSSL
- 番外編…SNI SSL
- 番外編…Apache再起動時に秘密鍵のパスフレーズ入力をサボる方法
- 番外編…「Let’s Encrypt」でSSL/TLSサーバー証明書を無料で取得する
- 「Let’s Encrypt」とは?
- サーバー側の下準備
- 証明書取得作業
「Let’s Encrypt」とは?
「Let’s Encrypt」は、無料かつ迅速にSSL/TLSサーバー証明書を取得することができるサービスです。証明書の有効期間は90日と短いものの(更新は可能)、無料でSSL/TLSによる安全な通信を行うことができるようになるので、一考の価値はあります。必要な費用は寄付等で賄っているようです。
サーバー側の下準備
Let’s EncryptでSSL/TLS証明書を発行する場合は、サーバーに「Certbot」というプログラムを導入する必要があります。これがLet’s Encryptとの通信を行い、ドメインの認証が完了次第、証明書を発行します。この辺の仕組みは「ACMEプロトコル」に支えられているので、興味がある人は各自ググってみてください。それでは、以下のコマンドでCertbotをインストールしてください。今回は汎用性重視(WEBサーバーソフトウェアの種類にかかわらず使えるようにする…証明書を発行するだけ)で作業を行います。 [VIM] sudo yum install certbot [/VIM]
また、既に済ませているとは思いますが、サーバー側でHTTPとHTTPSの通信を許可し、HTTPS化するWEBサイトのドメイン名及びドキュメントルートを確定させてください。また、HTTPS化するWEBサイトに対して.htaccessなどでアクセス規制を敷いている場合は、それを一時的に解除してください。
証明書取得作業
インストールが完了したら、証明書取得作業に入ります。以下、secure.example.netはHTTPS通信を導入するドメイン名です。 [VIM] sudo certbot certonly How would you like to authenticate with the ACME CA? ——————————————————————————- 1: Place files in webroot directory (webroot) 2: Spin up a temporary webserver (standalone) ——————————————————————————- #1(webroot)を選択 Select the appropriate number [1-2] then [enter] (press ‘c’ to cancel): 1 #通知を受け取れるメールアドレスを入力 Enter email address (used for urgent renewal and security notices) (Enter ‘c’ to cancel): Starting new HTTPS connection (1): acme-v01.api.letsencrypt.org ——————————————————————————- Please read the Terms of Service at https://letsencrypt.org/documents/LE-SA-v1.1.1-August-1-2016.pdf. You must agree in order to register with the ACME server at https://acme-v01.api.letsencrypt.org/directory ——————————————————————————- #利用規約に同意する(Aを入力) (A)gree/(C)ancel: A ——————————————————————————- Would you be willing to share your email address with the Electronic Frontier Foundation, a founding partner of the Let’s Encrypt project and the non-profit organization that develops Certbot? We’d like to send you email about EFF and our work to encrypt the web, protect its users and defend digital rights. ——————————————————————————- #Nを入力してメールアドレスがElectronic Frontier Foundationに渡ることを阻止 (Y)es/(N)o: n #HTTPS通信を導入したいドメイン名を入力(例 secure.example.net) Please enter in your domain name(s) (comma and/or space separated) (Enter ‘c’ to cancel): Select the webroot for secure.example.net: ——————————————————————————- 1: Enter a new webroot ——————————————————————————- #1(webroot)を選択 Press 1 [enter] to confirm the selection (press ‘c’ to cancel):1 #HTTPS通信を導入したいドメイン名のドキュメントルートを入力 Input the webroot for secure.example.net: (Enter ‘c’ to cancel):/home/hoge/public_html/secret #しばらく待てば秘密鍵、証明書が発行される Waiting for verification… Cleaning up challenges Generating key (2048 bits): /etc/letsencrypt/keys/0000_key-certbot.pem Creating CSR: /etc/letsencrypt/csr/0000_csr-certbot.pem IMPORTANT NOTES: – Congratulations! Your certificate and chain have been saved at /etc/letsencrypt/live/secure.example.net/fullchain.pem. Your cert will expire on 2017-06-11. To obtain a new or tweaked version of this certificate in the future, simply run certbot again. To non-interactively renew *all* of your certificates, run “certbot renew” – If you like Certbot, please consider supporting our work by: Donating to ISRG / Let’s Encrypt: https://letsencrypt.org/donate Donating to EFF: https://eff.org/donate-le [/VIM]

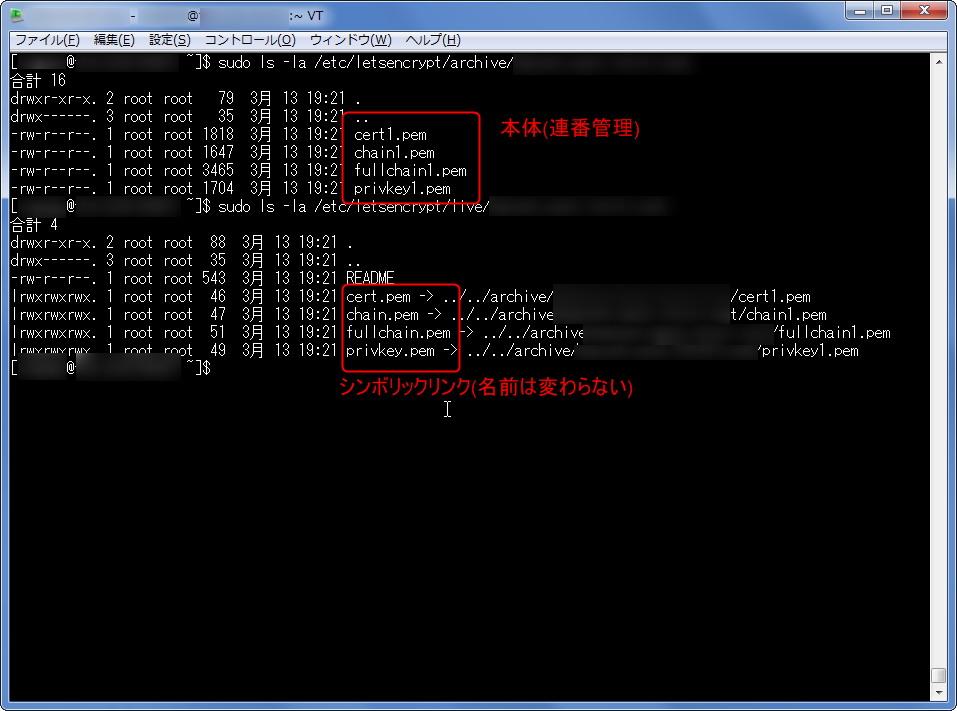
Let’s Encryptでは、秘密鍵や証明書は基本的に/etc/letsencrypt/archive/secure.example.net以下に生成され、それらの名前は証明書の更新時に書き換わります(連番管理されている)。ですが、/etc/letsencrypt/live/secure.example.netには証明書類本体へのシンボリックリンク(Windowsでいうところのショートカットみたいなもの)があるので、Apacheなどで設定を行うときには、名前が変わらないシンボリックリンクの方を指定するようにします。なお、Let’s Encryptで生成される秘密鍵にパスフレーズは設定されていないので、Apache等を再起動する時にパスフレーズを入力することはありません。
/etc/letsencrypt/live/secure.example.netには、以下のようなファイル(証明書類本体へのシンボリックリンク)があるので、Apacheなどで設定する場合にはこちらを指定します。
- cert.pem …SSL/TLSサーバー証明書
- chain.pem …中間CA証明書
- fullchain.pem …cert.pemとchain.pemが一緒になったファイル
- privkey.pem …秘密鍵
証明書の更新も同様の手順で行えます。 [VIM] sudo certbot certonly How would you like to authenticate with the ACME CA? ——————————————————————————- 1: Spin up a temporary webserver (standalone) 2: Place files in webroot directory (webroot) ——————————————————————————- #2(webroot)を選択 Select the appropriate number [1-2] then [enter] (press ‘c’ to cancel): 2 Starting new HTTPS connection (1): acme-v01.api.letsencrypt.org #証明書を更新したいドメイン名を入力(例 secure.example.net) Please enter in your domain name(s) (comma and/or space separated) (Enter ‘c’ to cancel):secure.example.net Cert not yet due for renewal You have an existing certificate that has exactly the same domains or certificate name you requested and isn’t close to expiry. (ref: /etc/letsencrypt/renewal/secure.example.net.conf) What would you like to do? #このメッセージは証明書の有効期限が十分残っている場合のみ表示される ——————————————————————————- 1: Keep the existing certificate for now 2: Renew & replace the cert (limit ~5 per 7 days) ——————————————————————————- #2を選択して証明書を更新 Select the appropriate number [1-2] then [enter] (press ‘c’ to cancel): 2 Renewing an existing certificate Performing the following challenges: http-01 challenge for secure.example.net Select the webroot for secure.example.net ——————————————————————————- 1: Enter a new webroot ——————————————————————————- #1(webroot)を選択 Press 1 [enter] to confirm the selection (press ‘c’ to cancel): 1 #証明書を更新したいドメイン名のドキュメントルートを入力 Input the webroot for secure.example.net: (Enter ‘c’ to cancel):/home/hoge/public_html/secret Waiting for verification… Cleaning up challenges Generating key (2048 bits): /etc/letsencrypt/keys/0001_key-certbot.pem Creating CSR: /etc/letsencrypt/csr/0001_csr-certbot.pem IMPORTANT NOTES: – Congratulations! Your certificate and chain have been saved at /etc/letsencrypt/live/secure.example.net/fullchain.pem. Your cert will expire on 2017-06-11. To obtain a new or tweaked version of this certificate in the future, simply run certbot again. To non-interactively renew *all* of your certificates, run “certbot renew” – If you like Certbot, please consider supporting our work by: Donating to ISRG / Let’s Encrypt: https://letsencrypt.org/donate Donating to EFF: https://eff.org/donate-le [/VIM]


